Risk Management Practice and Incident Reporting Procedure 2022
Townsville Bushwalking Club's risk management and incident reporting procedure outlines walk leader responsibilities, participant safety expectations, emergency communication protocols, and post-incident reporting for safe bushwalking activities.
Townsville Bushwalking Club Inc
Risk Management Practice and Incident Reporting Procedure 2022.
Townsville Bushwalking Club risk management practices includes several factors that have been developed from experience and the expectations of the insurer. They include:
- Walk Leader Guidelines
- Walkers Guidelines
- Expectations of the insurer
- Incident / Emergency procedures during an activity
- Incident Reporting Procedure
Walk Leader Guidelines
Planning a Walk:
Provide an accurate description of the walk, including the activity grade and gear required by walkers (e.g. water, food, shelter, footwear, clothing etc) and forward the details to the walks coordinator (Secretary / President) or committee for approval.
Confirm that the property / area is accessible and approved for the activity. Some properties require documentation and or liability waivers to be submitted before approving entry.
Pre-walk the route if possible taking note of any potential risks and morning tea and lunch spots. If the walk is "exploratory" plan the walk from reference to the map or by reference to other information sources.
Have an alternate plan in case of unforeseen circumstances. e.g. heavy rainfall, flash flooding, track erosion, transport changes, extreme heat etc.
Choose areas and walk levels that are within your capabilities as a leader.
Clearly describe potential hazards, type of terrain, fitness level required, to all intending participants and exclude any participant who in the leader's judgement may have difficulty completing the planned activity.
Leave comprehensive details of the walk with a reliable person including instructions on what to do if you do not return at the expected time.
A few days prior to the walk check transport details if applicable, expected weather conditions, fire conditions, park closures etc.
Confirm with the Secretary that walkers claiming to be members are validated as members and have signed the members Acknowledgement Of Risk (AOR) form. Members who have not been confirmed as signing an AOR must submit a signed AOR before the walk, or sign the Temporary Members AOR on the day of the walk. Note that it is mandatory for insurance cover that each participant has signed an AOR.
Pen, pencil, notebook, spectacles – to record any trip incidents or details. Mandatory for every trip.
Prior to the Start of and During the Walk:
Ensure a map, compass, first aid kit and any other equipment appropriate for the planned activity are brought on the activity.
Ensure all participants complete the sign on sheet which includes the Acknowledgement Of Risk form. Collect walk registration money from temporary members.
Hold an introductory circle prior to setting out and advise details of the walk including expected terrain, distance, possible hazards, expected return time etc. and that all participants have the requisite experience, equipment and fitness for the activity. The leader has the right to refuse participation to any persons they consider may present a risk to themselves or other participants or do not have the necessary skills for the activity.
Ascertain if anyone is carrying a mobile phone, GPS or EPIRB for emergency use and whether any participants have a first aid certificate and/or medical training.
When relevant, ensure car is secured, lights off and keys securely put away.
Ensure everyone has adequate food & water for the activity.
Have a reliable person act as "tail" for the group and advise participants not to fall behind this person for any reason without advising the "tail'. Ensure you maintain a line of sight with the participants. For large groups, appoint a middle person (the UHF handheld radios provided by the club can be used for large groups).
On track walks, appoint a person to wait at track junctions to ensure nobody goes the wrong way. Carry out regular head counts to ensure you have everyone.
Have regular drink and rest breaks and allow walkers to regroup.
Manage the group, & monitor any unexpected hazards. Ensure everyone is comfortable with the pace and conditions. Remember it is easier for fast walkers to slow down rather than slow walkers to speed up.
At the End of the Walk:
Ensure that all participants have arrived at the finishing point, & that all vehicles will start before anyone leaves.
Forward the completed sign on sheet including reports of any incidents / accidents to the walks co-coordinator or committee.
Any incident / accident that results in injury, no matter how minor, is to be reported to the club secretary. This is due to potential complications that may arise for the walker at a later date, even from supposed minor injury.
Hand in or bank walk registrations monies collected from trip.
Contact the person with whom trip details were left to inform them of return.
Collect club radios from tail end Charlie or other persons, collect and account for all club equipment.
Re charge all radios and comms / safety equipment, and return at next meeting.
Incident / Emergency procedures during an activity
Walk Leader Emergency Guidelines.
Before the walk
Obtain club communications equipment from the President. This includes a PLB, satellite phone, and if required the hand held UHF radios.
Ensure you and at least one other member of the group are competent in use of a PLB and satellite phone.
Ensure you have good understanding of how emergency services respond, and limits of satellite coverage for use of PLB and satellite phone.
Before each walk, test PLB and satellite phone to ensure serviceable.
Before each walk, update on AMSA beacon registration website the activity details. Ensure that the PLB AMSA registered contacts are up to date and will be contactable during the activity. AMSA beacon registration and emergency contact details – they use this to contact the emergency contact for that beacon and confirm genuine as their first step.
Ensure you know how to read latitude / longitude from a GPS or map and be able to provide that to emergency services if required. Emergency services will not use UTM grid references.
Ensure you have the club instructions with you during the walk, or familiarise yourself before the walk.
At start of walk, identify if any medically / first aid qualified or other specialist people are on the walk that may be of assistance in an incident.
AMSA Guidance
Two-way communications via a mobile/satellite phone or radio is the most effective means of communication when in a distress situation, with some of the reasons outlined below:
- Instant confirmation that the call has been received by emergency services;
- Ability to communicate position, nature of distress, required assistance;
- Emergency services can adequately scale response assets according to required assistance;
- Ability to provide updates on the situation and also receive advice until emergency services arrive.
If two-way communications are not available, then a distress beacon should be activated in situations of grave and imminent danger. This equates to when you feel you are facing a life threatening situation. This is a personal decision that is different for everybody.
Incident Action
Do not move patient. This is critical in case of spinal or other injuries. Emergency response can get to the scene, leave it to them to get to the patient. If you can see the sky (even though the trees), then the helicopter can winch a paramedic / crewman down to the site.
Obtain latitude / longitude from GPS or map. The Three Words app is a handy method to pass on coordinates to Triple Zero.
If in mobile phone range, call Triple Zero. This provides fastest response.
Call Triple Zero on the satellite phone, when reception is suitable. If Triple Zero does not work, try 112, or then RFDS Cairns. There are other phone numbers with the phone instruction. Do not rely on satellite phone network connection being reliable at all times.
Pass on mobile phone or satellite phone number to emergency services -so they can ring back if required.
The helicopter pilot may phone the group for further information.
If Triple Zero uncontactable by mobile or satellite phones, activate PLB. Triple Zero may ask that you also active the PLB so the helicopter can home in on it.
If the PLB is activated, advise Triple Zero that it has been activated.
Ensure you are in a clear open area and as high as possible to increase your visible area of sky for satellites. Steep, narrow gorges or overhanging foliage can affect performance.
When activating PLB, do not do this next to patient. Locate the PLB a suitable distance way, suggest minimum 25 to 50 metres. This is due to dangerous downdraft from helicopter and hazard it provides to people on the ground.
Be prepared to survive for some time until emergency services arrive. It may take a while, at least several hours to maybe overnight depending on location and conditions. Experience has demonstrated up to 3 hrs in daylight and good conditions for helicopter arrival.
Do not put other people at risk.
Evacuate non essential people from the scene. Ensure they are led by a capable person and also have some form of emergency communication device.
If not in an open area, consider any signalling devices that may be handy – emergency space blanket from first aid kit, bright clothing, signal mirror, torches, flare, build a smoky fire. Use emergency /space blanket as signal sheet.
When helicopter approaches, it homes in on the beacon using special equipment on the helicopter, and it may ping the beacon – the beacon will be heard to ping and strobe flash madly for a short period.
The helicopter will do several over flights of the scene before acting.
Downdraft from helicopter is powerful and severe. Hazardous, lot of flying debris. High risk of injury from falling / flying tree branches, rocks, or other objects. Eye protection is essential. Reduce number of people on site. Ensure that people on site protect themselves from downdraft of the helicopter. Ideally the patient should not be under the downdraft, depending on scenario. Experience has demonstrated that downdraft under the helicopter is very powerful and cyclonic, lot of debris and water being flung about, hazardous area. Do not sit under limbs of trees. Rocks become wet from water spray, increasing hazards.
Do not turn off the PLB until directed to do so by emergency services.
IF PLB ACTIVATED ACCIDENTALLY
Deactivate PLB and call AMSA Search and Rescue 1800 641 792
Emergency Contacts
The walk leader should contact the emergency contact listed on the walk registration form for the patient and notify of the incident as soon as practice. Generally this would be as soon as emergency services take the patient. Be careful of providing alarming information, keep it concise. Advise of location the patient is being transported to.
The walk leader is to contact the club President or next in line committee member to notify of the incident as soon as practible.
Post Incident Reporting
The walk leader is to record the incident on the trip sheet.
The walk leader is to complete an Incident Report Form. To be completed by activity organizers/walk leaders as soon as practical after the incident. This report is to be kept by the club secretary as a formal club record. In the event of any serious injury (an injury requiring medical treatment) copies of the incident report must be forwarded to the Insurance Convener for the State of the Member Club as soon as possible (time delays may prejudice the insurers acceptance).
Emergency Communications Equipment Information.
How the Iridium satellite network and PLB system operate
Two-way communications via a mobile/satellite phone or radio is the most effective means of communication when in a distress situation, with some of the reasons outlined below:
- Instant confirmation that the call has been received by emergency services;
- Ability to communicate position, nature of distress, required assistance;
- Emergency services can adequately scale response assets according to required assistance;
- Ability to provide updates on the situation and also receive advice until emergency services arrive.
If two-way communications are not available, then a distress beacon should be activated in situations of grave and imminent danger. This equates to when you feel you are facing a life threatening situation. This is a personal decision that is different for everybody.
Iridium Satellite Phone
It can call Triple Zero (000) direct.
It can also call some 1300 and 1800 numbers – this depends on whether the organisation permits international calls to their 1300 / 1800 number. 1300 / 1800 capability in case need to call AMSA and advise of accidental activation of PLB.
Iridium satellite network relies on line of sight between phone and a satellite. If you do not have line of sight (i.e. blocked by canyon, terrain, buildings, foliage) you may not get a network service connection. As the satellites orbit network connection may vary from good to poor to nil to good.
Important thing is to keep the antenna vertical when using. And have line of sight visibility to a good portion of sky. Best location is a high spot with open view to all the sky.
For Townsville the Iridium satellite plane is east off the coast, the other well west over WA. Keep that in mind for line of sight.
Satellite and phone works on line of sight. Iridium satellites run north south or south north plane – keep that in mind for line of sight to satellite (not necessarily directly overhead either, may be lower near horizon). Whilst there is a network of orbiting Iridium satellites, only 6 are on the north south / south north plane in our area and only one may be in sight at any time. As each satellite passes over you may see signal strength improve then degrade depending where it is in the sky. So with those factors, intermittent connection is something that can occur.
Iridium satellites, all 66 of them are in constant motion around the Earth at orbits of around 780 kilometres above the Earth. This means the particular satellite covering your area will only be providing you with signal for about 10 minutes. Before the satellite disappears over the horizon, if you are in a good spot the next satellite will have risen above the horizon, be in clear view for you and the phone and the satellite system will work together to hand your signal from the satellite about to disappear to the satellite that has just up over the horizon seamlessly. If you are not in a really good spot, then it is likely you will lose the signal from the first satellite, and then have to wait a few minutes for the next satellite to come into LINE-of-SIGHT to operate.
It take about 10 minutes for a satellite to move away and be replaced by the next one in orbit so signal outage caused by poor line-of-sight issue will not be too long with the Iridium phone.
PLB System
What happens after activation
Distress beacon is activated
When your life is in danger and you can't get hold of emergency services by phone or radio, activate your distress beacon. Your beacon can be activated from anywhere on the Earth's surface, regardless of whether you were travelling by air, land or sea.
Signal is received by satellite
The international search and rescue satellite system, Cospas-Sarsat, listens from space for distress signals. When it hears a signal, it notifies the nearest ground station.
Beacons transmit on 406MHz which is detectable by satellite and 121.5MHz so emergency services can hone the beacon with special search and rescue equipment.
Rescue coordination centre is notified
Your distress call is escalated through a local user terminal, mission control centre and then the rescue coordination centre (RCC) responsible in that region for arranging search operations.
If your beacon is registered, the details are provided to the RCC in the country in which the beacon is both activated and registered.
Search and rescue operations commence
Search and rescue authorities commence search operations as soon as they can. If your beacon is registered, AMSA Search and Rescue will look up your account and ring your emergency contacts immediately. If emergency contacts are aware of trip details or trip details have been submitted online, search operations can be commenced much sooner. So it is essential to keep your details up to date.
The time it takes for rescue will vary depending on the circumstances. Be prepared to survive. When you see or hear search personnel or aircraft in your area use flares, torches, or light a fire (if it's safe) to help them pinpoint your location.
How long does it take to be rescued
The time it takes for search and rescue personnel to reach you depends on a number of factors, including the weather, terrain and accessibility of your location. The more remote the location of the distress incident, the longer the response time. In all instances, be prepared to survive.
Satellites cannot detect beacons through mountains, trees or buildings. If your beacon has not been deployed correctly with the aerial vertical in a clear open area or you are located in a valley, geostationary (GEO) satellites are unlikely to see you. In these cases, you must wait for polar-orbiting (LEO) satellites to pass overhead, which may take several hours.
Another important factor which determines how long your rescue takes is if you have a Global Positioning System (GPS) beacon or a non-GPS beacon.
Note : Townsville Water Police is the local regional rescue coordinator, even for land SAR.
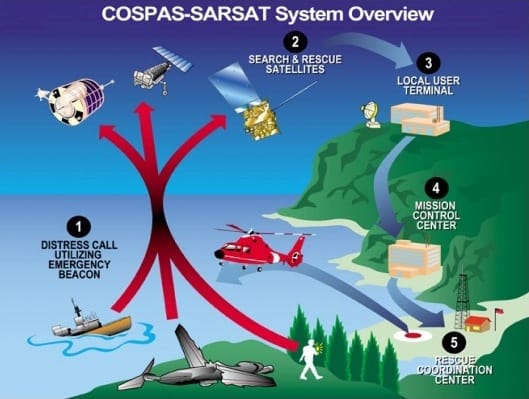
Cospas-Sarsat system diagram
The Cospas-Sarsat System is divided into space segments comprising distress beacon receivers on Polar-orbiting satellites and on satellites in geo-stationary orbit over the Equator. The ground segment is made up of a network of Local User Terminals (LUTs) that are the ground receiving stations for the satellite transmissions with Mission Control Centres (MCCs) that analyse and pass the distress alerts to responsible Rescue Coordination Centres.
In the Australian search and rescue region there are three LUTs located at Albany (WA), Bundaberg (QLD) and Wellington (NZ) that are controlled by the MCC located within the Australian Joint Rescue Coordination Centre (JRCC) in Canberra.
Alerts from 406 MHz distress beacons may be received and processed by geo-stationary satellites and passed to JRCC-Australia within minutes. If the beacon has GPS capability then a very accurate position may be transmitted with the alert. Non-GPS beacons require detection by a Polar-orbiting satellite before a position can be obtained.